Automation Script
When you get an access token, ReadyAPI displays the login, consent, and other screens. Each screen is a page that you interact with to grant permissions on behalf of the resource owner. You can create automation scripts in ReadyAPI to simulate the needed actions and grant permissions in unattended mode.
How to create automation scripts
Create automation scripts in the Automation editor that you can open either in the Auth Manager or in the Auth panel:
In general, an automation script creation consists of the following steps:
Create an automation script to emulate user actions on this page.
Repeat these steps for all the pages involved in the process.
Inspect web pages
Use developer tools in any external browser to inspect the web pages involved in the authorization process and identify the objects to interact with.
Create automation scripts
In the Automation editor, specify JavaScript commands that simulate the actions needed for granting permission - entering the login and password, clicking the needed buttons, and so on. For example, to simulate getting an access token from the authorization page, use the following commands:
How automation works
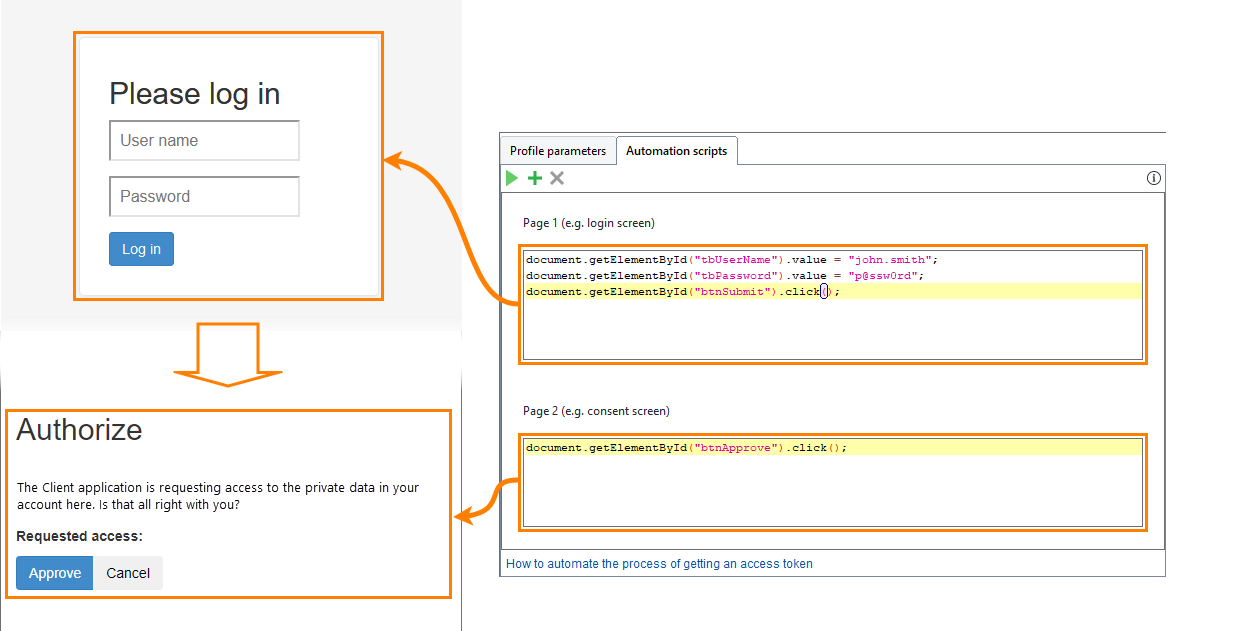
The Automation editor runs automation scripts in a background instance of the internal browser. For each screen, you create a separate script in the Automation editor. When you get an access token, ReadyAPI displays the screens in the internal browser and runs scripts one by one. The URL change signals ReadyAPI to run the next script.
For example, an entering-valid-credentials page may have a second page on which the authorization server asks whether you grant permission to the client application. The automation script in this case may look like this:
 |
Important
Background redirects may cause the rest of the next script to run while the page has not yet changed. An authorization server may change the authorization process by adding or skipping pages. When you get an access token for the first time, ReadyAPI asks you to log in, while the next time it remembers your account and asks only for a password. We recommend adding a log-in script to your script to ensure the script runs on the correct page. ReadyAPI does not detect which page is currently shown.
Automation samples
Follow these links to see the examples of how to configure automation:
Forced token update
By default, ReadyAPI requests a new token only when the old one expires. You can also use scripts to force ReadyAPI to update the token, whether or not it has expired.
To do this, you can use the requestAccessCode method of the OltuOAuth2ClientFacade class that assigns a new access token to the specified authorization profile. See the following script as an example:
Important
If you are using OAuth 2.0 Azure authorization, replace the OltuOAuth2ClientFacade class in the script with the OltuOAuth2AzureClientFacade class.
On headless machines
On headless machines where the browser window is inaccessible, you can use the same approach as described above. However, there are some things you must do first:
Install and run any X Server.
Specify the display number for your X Server (see your X Server's documentation).
Open the
testrunner.shfile in a text editor and add the following line:export DISPLAY=<ip>:<index>
Troubleshooting
Retrieval process exceeds timeout
The default timeout for accessing a new access token is 5 seconds. Usually, it is enough to get a new access token. If your retrieval process takes more time, the automation fails, and the ReadyAPI log contains the following messages:
WARN: OAuth2 access token retrieval timed out after 5000 ms.
ERROR: Exception in request: java.lang.RuntimeException: Unable to refresh expired access token.
To increase the timeout, use the oauth2.access.token.retrieval.timeout JVM option. See Modifying JVM Settings to learn how to do it.
Browser Error
The browser displays all the errors returned by the authorization server.
Validation Error
If a script cannot be validated for some reason, you will get an error message.