OAuth Automation Sample (Using Google OAuth)
This tutorial shows you how to create an automation token retrieval using Google OAuth as an example.
Prerequisites
To create automation, configure the OAuth 2.0 authorization. For more information, see Enabling OAuth 2.0 Authentication.
Preparation
Open any client application in a browser
To start creating automation, you need to analyze the login and consent screens in any browser that provides development tools (for example, Chrome, Safari, Firefox, and so on).
Go through the process of getting an access token using any client application that runs in a suitable browser. Providers may also offer a playground to test an authorization process, so you can use it to explore the login and consent screens without using a client application.
In this tutorial, use Google OAuth 2.0 Playground to analyze the login and consent screens:
Open Google OAuth 2.0 Playground: https://developers.google.com/oauthplayground/
Select the needed scope and click Authorize APIs.
Tip
Log out from your Google account or use private mode in the browser to simulate a clean testing environment.
Open the automation script dialog
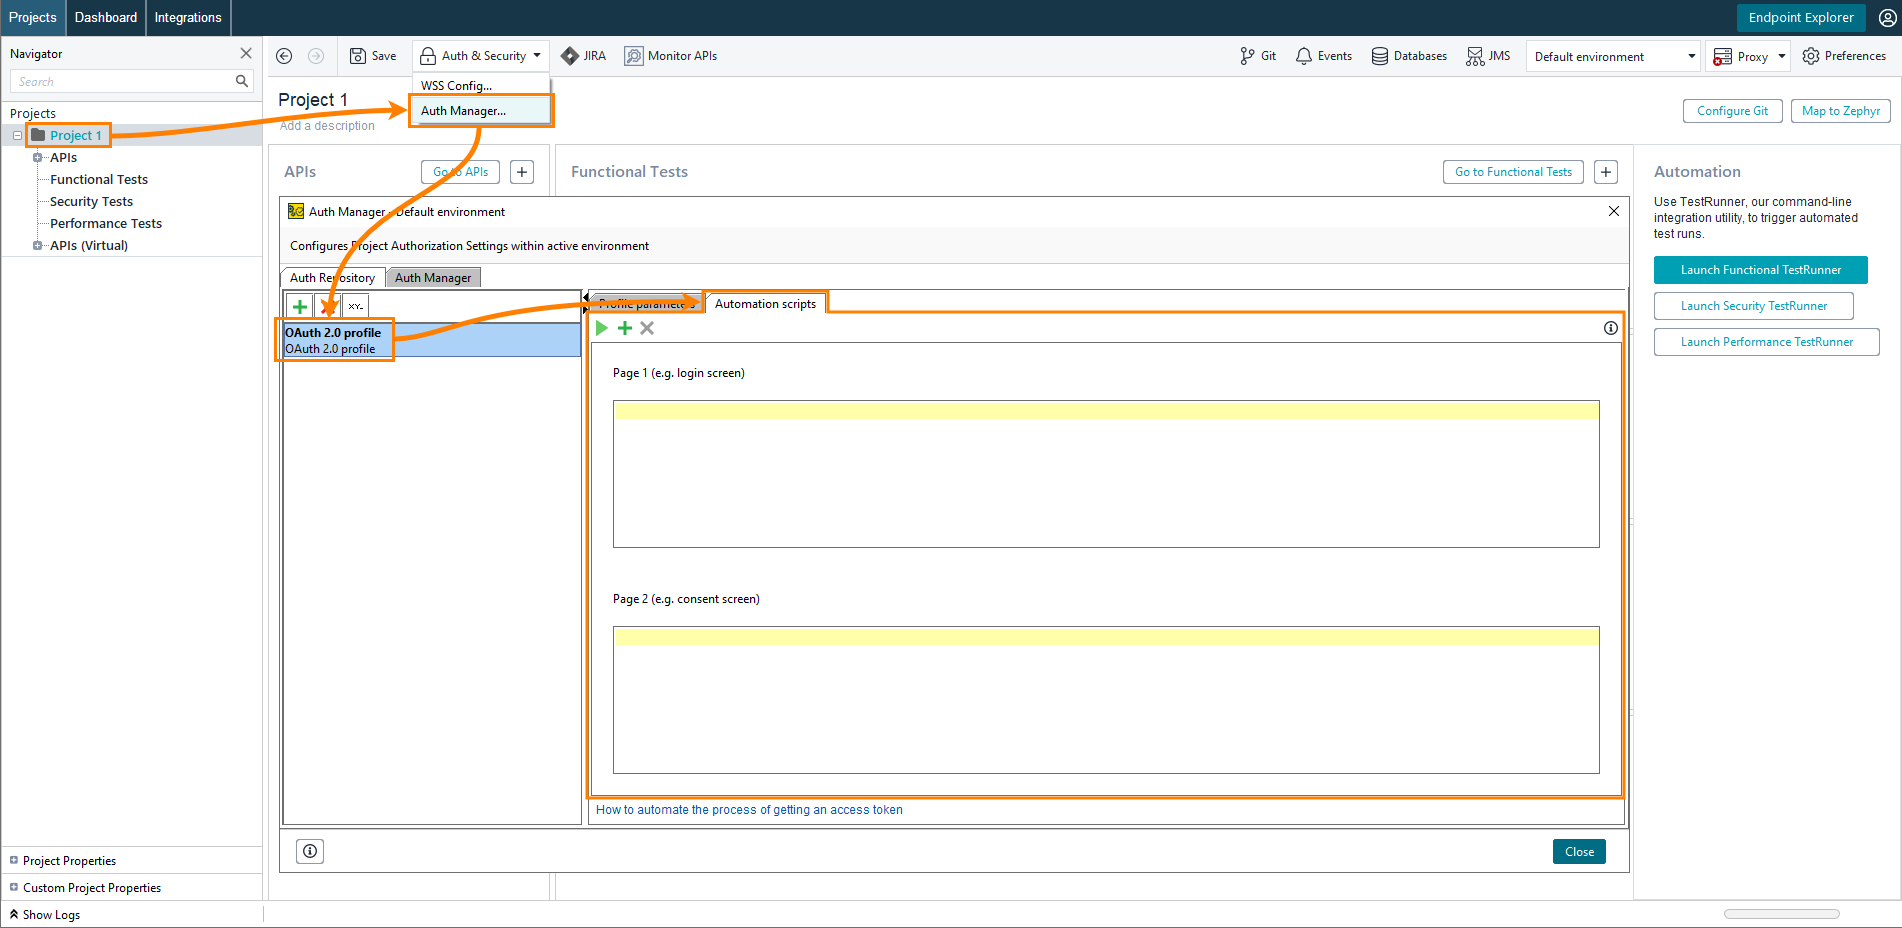
You can open the automation editor either in the Auth Manager or in the Auth panel:
Select your project.
Open Auth Manager.
In the Auth Manager dialog, select the OAuth 2.0 authorization profile for which you want to enable automation.
Open the Automation scripts.
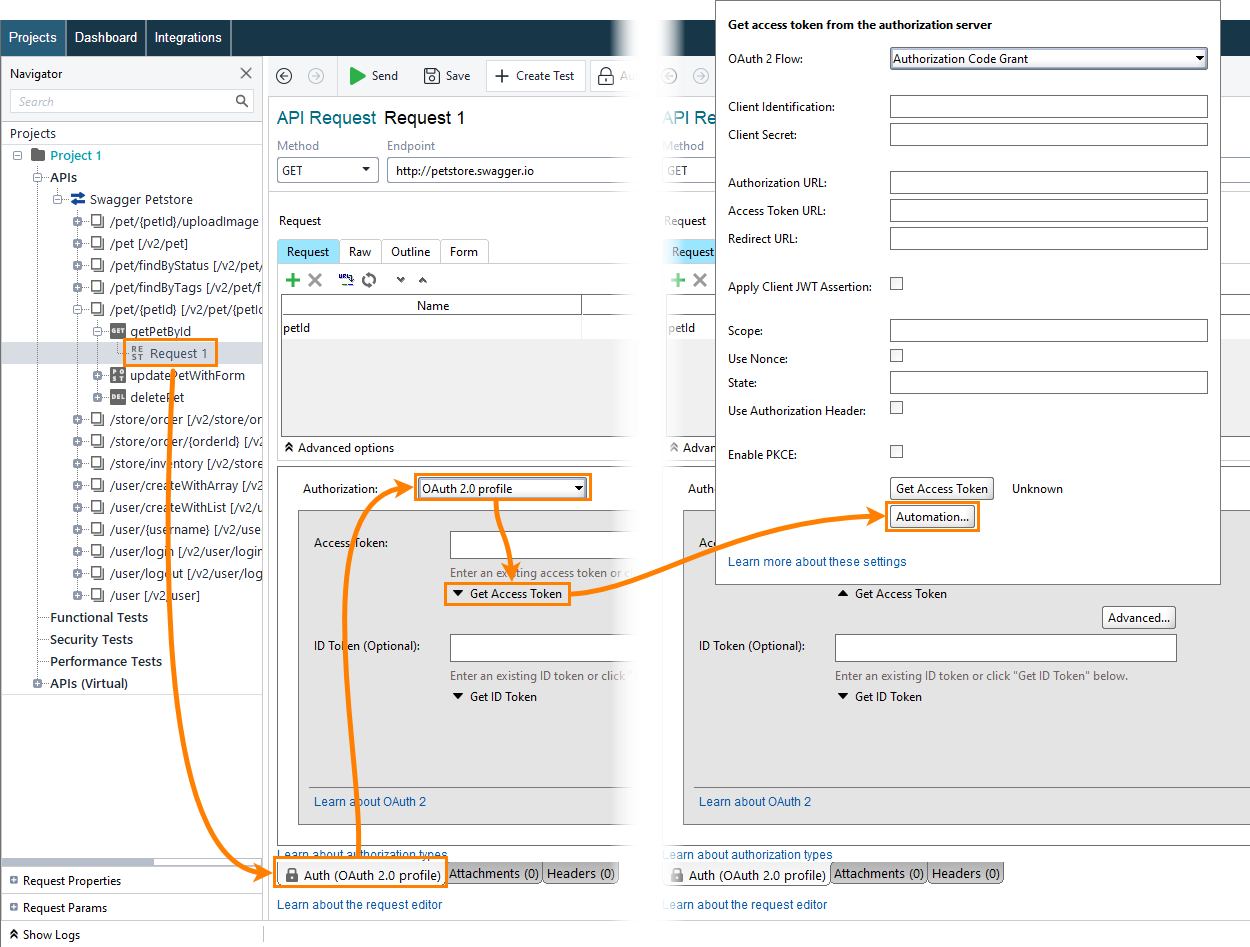
Open a request.
Open the Auth panel.
Select the OAuth 2.0 authorization profile and click Get Access Token.
In the Get access token from the authorization server dialog, click Automation.
1. Login input
At this step, explore the login page and create a script that simulates a login input.
Right-click the login text box and select Inspect (or a similar menu item in your browser).
The browser displays the HTML element associated with the input field. To interact with the element from the script, obtain its
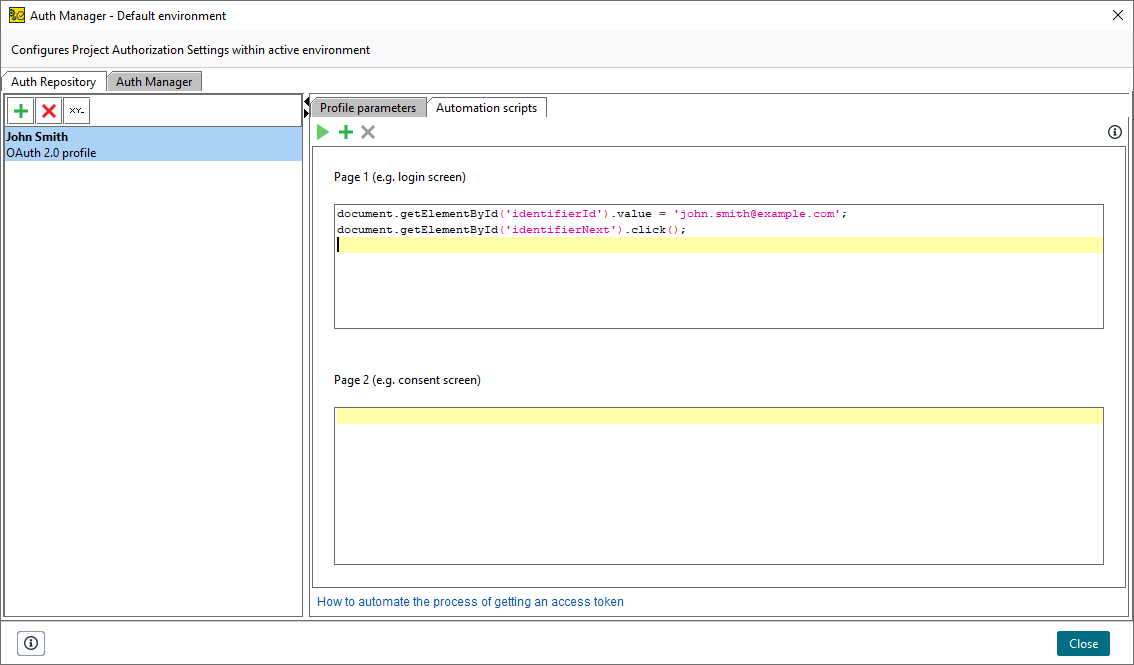
idattribute. Use thegetElementByIdmethod.The JavaScript code that enters the needed login to the input element may look like this:
document.getElementById('identifierId').value = 'john.smith@example.com';Test this command by using the Console panel of the browser.
Tip
Inserting text through script causes visual artifacts. It does not affect the script.
Emulate clicking the Next button. Right-click the button and select Inspect. The button element does not have an
idattribute. Use the parentdivelement that has anidattribute -identifierNext:Clicking the
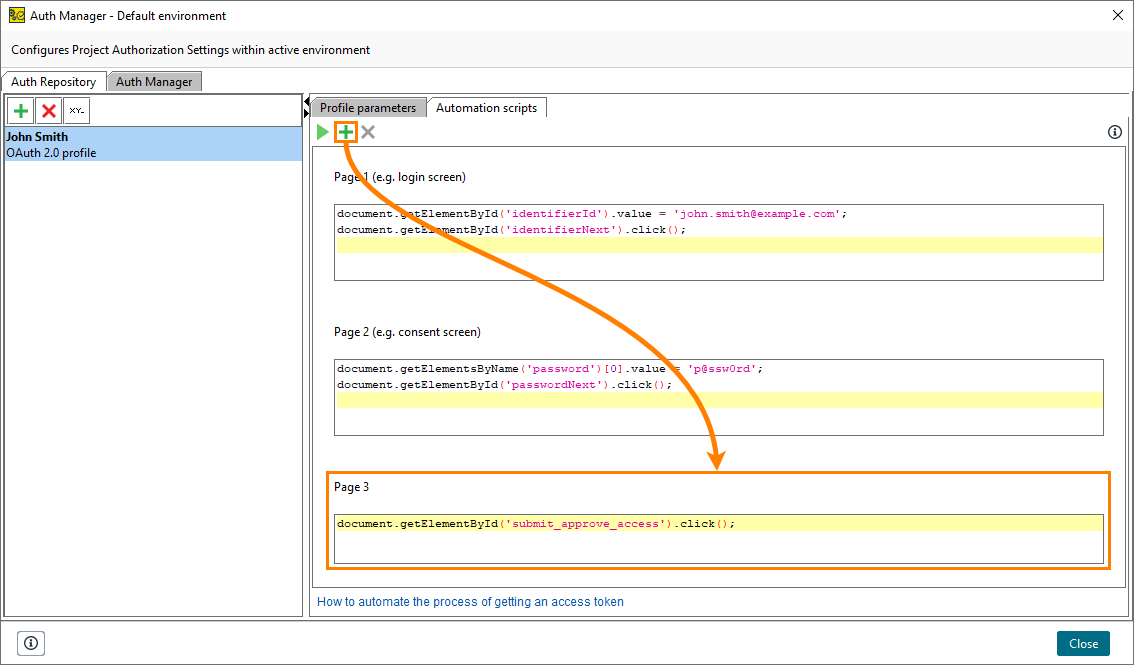
divelement also fires the click on the child button element. So, to simulate a click on the button, you can use the following JavaScript code:document.getElementById('identifierNext').click();Enter the code in the Page 1 section of the ReadyAPI Automation script panel:
2. Enter password
On the next page, enter a password. Use the same approach to obtain the needed elements and simulate the required actions.
Right-click the password field and select Inspect. The
inputelement does not have the id attribute. Use thefindElementsbyNamemethod and find the needed element by itsname.The method returns an array of the found elements. In our case, there is only one element with the same name, so we need the first element of the array.
To enter the password, use the same approach you use on login screen.
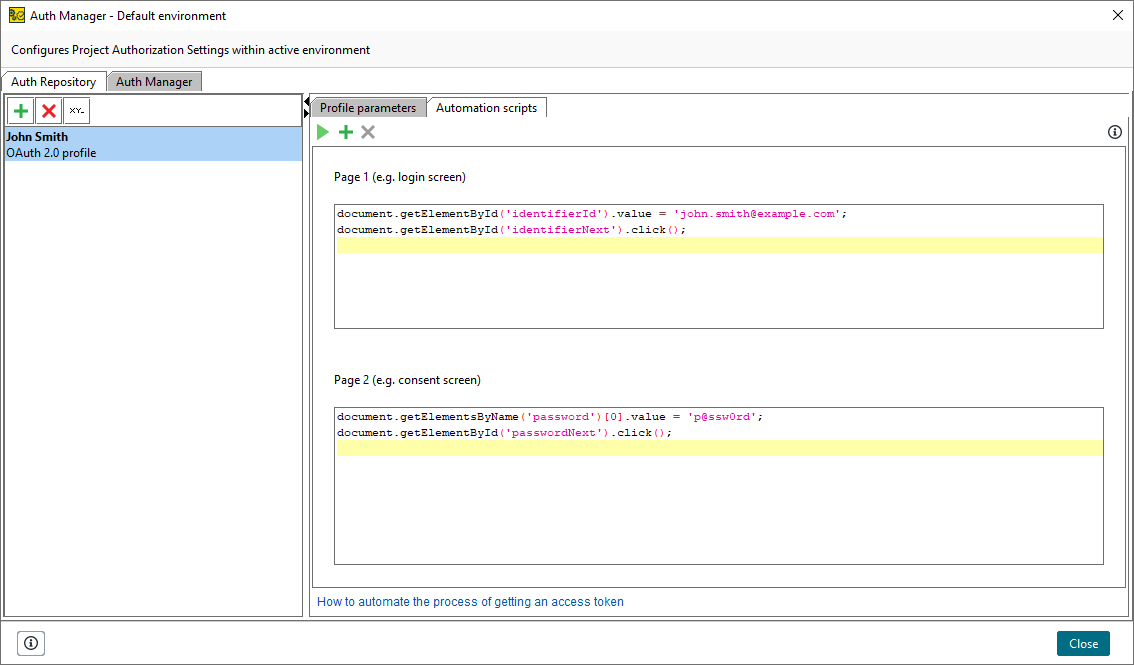
document.getElementsByName('password')[0].value = 'p@ssw0rd';Right-click the Next button and select Inspect. The button element does not have an id attribute. Use the
idattribute of the parentdivelement.Use the following JavaScript code to click the button.
document.getElementById('passwordNext').click();Enter the code in the Page 2 section of the ReadyAPI Automation script panel.
3. Grant permissions
On the next page, Google provides you with detailed information about the client application and asks whether you want to grant permissions.
Right-click the Submit button and select Inspect. Use the
idelement of the parentdivelement.To click the button, use the following JavaScript code.
document.getElementById('submit_approve_access').click();On the ReadyAPI Automation script panel, click and enter the code in the added Page 3 section.
4. Final adjustments
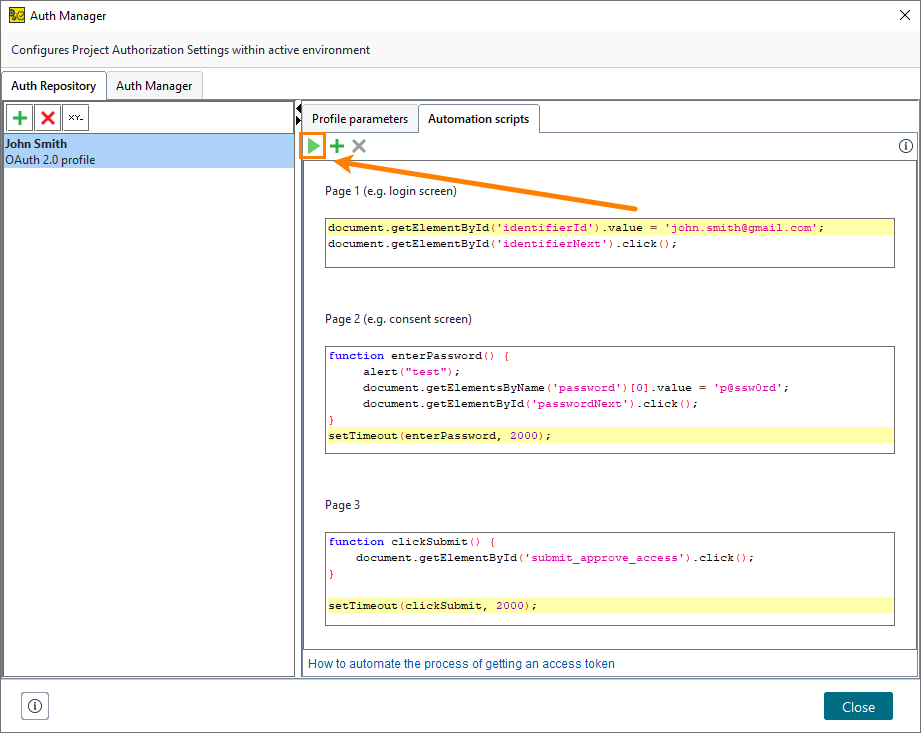
If you run the script now, it won't be able to obtain an access token. ReadyAPI runs the Page 2 script before the required elements are built. Use the setTimeout method to run the needed function after a delay:
function enterPassword() {
    document.getElementsByName('password')[0].value = 'p@ssw0rd';
    document.getElementById('passwordNext').click();
}

// Runs the enterPassword function after 2000 milliseconds (2 sec)
setTimeout(enterPassword, 2000);
Add the setTimeout function to the Page 3 section:
function clickSubmit() {
    document.getElementById('submit_approve_access').click();
}

// Runs the clickSubmit function after 2000 milliseconds (2 sec)
setTimeout(clickSubmit, 2000);
Click to test the automation.
 |
Remarks
ReadyAPI performs authorization in the internal browser and does not store cookies. Each time ReadyAPI runs automation, the authorization process remains unchanged. However, if the authorization server changes the process on its own end, your script may stop working.
Background redirects may trigger the next script in the list to run even when the page is not, in fact, changed. Add logic to your script to wait for the required elements. For example:
var a = 0;

function login() {
    document.getElementById('identifierId').value = 'john.smith@example.com';
    document.getElementById('identifierNext').click();
}

function waitLogin() {
    if (document.getElementById('identifierId')) {
        setTimeout(login, 10);
    } else {
        if (a++ < 5) {
            setTimeout(waitLogin, 1000);
        }
    }
}